Saturday, 1 November 2008

Apple and Blackberry Tart

There's nothing so yummy on a cold autumn evening as warm tart and custard and, I think that, Apple and Blackberry Tart is about as comforting as it gets so please try this recipe and join me in a large piece.


For the filling:
2 large bramleys
250g blackberries
sugar to taste
1 dessert spoon cornflour.

  1. Start by making the filling as it is best if it has cooled down before it is put into the pastry shell.
  2. Mix the cornflour with a little water and set aside.
  3. Peel, core and slice the apples. cook to make a puree. You can do this any way that you choose, but my method is to put them in a microwave proof bowl, cover with cling film and cook until they break down. This way you will not get burnt apples and it's easy.
  4. Stir in the cornflour mixture and mix quickly.
  5. Add the blackberries and sugar to sweeten to your taste. Set aside to cool while you get on with the pastry.

For the pastry:


150g plain flour
100g self raising flour
140g butter
60g caster sugar
1 egg
water to bind the mixture.

Place the flour into the bowl of a food processor, followed by the cold butter.
Turn the processor on and pulse several times until the mixture resembles fine breadcrumbs.

Turn out into a bowl and add the egg. If the mixture is still too dry, add some water. Be careful not to overwork the pastry.

Turn the pastry out onto a clean, floured work surface and, with floured hands, bring together to make a smooth dough, but don't knead.
Shape into a flattened ball, wrap in cling film and refrigerate for about 10-15 minutes.

Remove the pastry from the fridge. On a clean, floured work surface, roll it out with a floured rolling pin until it's slightly larger than the flan ring. Using the rolling pin, lift the pastry and lay it over the flan ring.
With your fingers, lightly press the pastry into the sides of the ring. Run a rolling pin over the top of the ring and pull away the excess pastry at the edges. Using your fingers, gently press the pastry up to slightly build up the height of the pastry at the edges.

Pour the filling into the pastry base and cover with a disc of pastry that you have rolled out from the remaining third of the pastry.

Bake in the center of the oven until golden brown.

Leave to cool a little before cutting. if you don't he filling will ooze out.

Saturday, 25 October 2008

Cannelloni filled with Broccoli and Ricotta

These broccoli and ricotta cannoli are just the thing to fill you on a cold autumn night and as that's what we're going to have in the next few weeks, you'd better get cooking straight away. They also freeze well so you can make them up to the pre-bake stage and freeze until you want them.

What you need to make these for 4 people:
12 sheets of lasagne pasta. You can use fresh of dried.
1 large head of broccoli
250g ricotta
100g freshly grated parmesan
salt. pepper
1 egg
fresh breadcrumbs if needed
I tin of tomatoes
1 medium onion
1 clove of garlic
Hot chicken stock
1/2 pt of white sauce
What you do:
Steam the broccoli until tender and then mash roughly.
Add the egg, ricotta, parmesan, salt and pepper and enough bread crumbs to make a soft mixture. You don't want it to be sloppy as you will have to roll it in the pasta.
Now make the tomato sauce, by frying the onion and garlic in a little oil until lightly golden brown. Add the tomatoes and and about half a tin of hot stock. Simmer gently for about an hour until the sauce is reduced, season to taste.
Cook the lasagne sheets until soft enough to roll. Drain and lie them out on the work surface.
Divide the filling equally between the pasta sheets and then roll up. Make sure than the fold is under the cannelloni so that they do not open while cooking.
In a large roasting pan or baking pan that will hold the cannelloni in one layer add about 2 large spoons of tomato sauce. The tomato sauce should not be too thick. Place cannelloni side by side in the pan leaving a tiny space between each cannelloni. Cover with additional tomato sauce and the white sauce.
Sprinkle the parmesan cheese over top. Bake the cannelloni for about 1 hour.

Friday, 3 October 2008

Raspberry Cheesecake Cupcakes

Yumm, yumm, yumm. these just have to be tried to be believed. They are basically a cupcake with a topping of sweetened cream and cream cheese in equal quantities. I tend to sweeten to taste, I don't like things too sweet. Just enough sugar to contrast with the sharpness of the raspberries. Whip them all up together and pipe onto the cupcake. Fill the center with a compot of raspberries that you have thickened with a small amount of cornflour.

Sunday, 13 July 2008

Tea Time Scones

The sun has been shining today and that really is a surprise, even though it is July. It's the time of year that you should expect a guarantee of sunshine but this year the weather has been dreadful So by way of a celebration we are having tea in the garden with the speciality of the British cream teas: scones.
This one is brimming with cream and home made jam which makes anyone, even those with iron wills, unable to resist taking a mouthful.

To make these scones you will need:

225g/8 oz self-raising flour

1/4 tsp salt

50g/2 oz butter

50g sugar

1 egg

100ml milk, plus extra to glaze

  1. Preheat the oven to 220C/425 F/Gas 7. If you are using a convection/fan oven drop the temperature 25 degrees. Grease a baking sheet.
  2. Sift the flour and salt together in a large bowl. Rub in the butter and sugar until the mixture resembles breadcrumbs. Make a well in the flour and break in the egg gradually pour in most of the milk, mixing quickly with the tips of your fingers as you pour. DO NOT ADD ALL THE MILK AT ONCE. You should get a soft but not wet dough. It should look rough. If the dough is too wet it will expand sideways instead of rising straight up.
  3. On a lightly floured board, gently bring together the dough and roll or press out until it’s 2.5cm/1 inch thick and stamp out into rounds. I used a 4cm/2 inch cutter and made 7 rounds. In between each stamp, dip the cutter in flour and with a firm shake downwards release the scone directly onto the baking sheet- try not to press with your fingers or you will misshape the dough. It is also important to cut directly down into the dough, if you twist then they will rise unevenly. Another important point is to roll the dough out evenly. If the dough is on a slope before you cut out the scones, then the finished scone will also be like a downhill ski slope.
  4. Place on the baking sheet and brush with extra milk. Depending on size bake for 15-20 minutes, or until risen and golden.

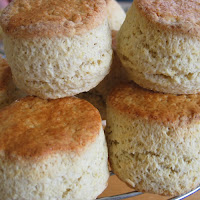
If you've made them the right way then this is what they should look like. If you haven't then who cares if they are a bit lumpy as they will taste good even if they look like a landslide.

Wednesday, 18 June 2008

Almost Store Cupboard Ham Pie

This pie is great because it is so simple and can be made from a tin or good quality ham when you have very little else to feed a fair number of people.


Firstly you need to make the pastry:

250g/9oz Plain Flour
125g/4.5oz cold unsalted butter, cut into 1cm cubes
2 egg yolks
2 tbsp ice water
heaped tsp salt
1 tsp sugar

Put the flour and butter in a dish, and put the dish in your freezer for 10 minutes.
Stir together the yolks, salt and water in a cup, and put the cup in the fridge.
When the time is up, tip the flour and butter into a food processor, add the sugar and pulse to combine, it will look somewhere between sand and porridge oats.
Pour in the egg yolk mixture and pulse till it looks like it's on the verge of coming together (stop just short of it binding). You may need to add more water.
Turn the dough out and mash together with your hands.
Once it is all bound together wrap in cling film, and let rest in the fridge (generally about half an hour. If you are making a springform cake tin pie, then cut one piece slightly larger than the other (one for the base, one for the top).

Ingredients to make the pie filling:

500g of ham that you have boiled yourself. or failing that a 500g tin of ham from Marks and Spencer. Don't buy one of those awful tins of ham made from reformed pieces. the better the ham, the better the pie. 
125g mild cheddar
250g cream cheese
1 medium onion, fried until soft
2 tbsp chopped parsley (optional) I didn't use any in the pie in the picture as I didn't have any at the time.
1 or 2 eggs, lightly beaten, it depends on how soft the mixture is
freshly ground black pepper
1 heaped tbsp dried breadcrumbs

To Make the Pie:
Cube the ham and pulse in a food processor until coarsely chopped.
Transfer to a bowl and then add all the other ingredients except the breadcrumbs. Preheat to 200C/400F, and put in a baking sheet.
Roll out the larger disc of pastry to cover the bottom and sides of a 25cm springform tin with a cm of overhang.
Sprinkle the bottom with breadcrumbs, then fill with the mixture.
Roll out the rest of the dough to make a lid.
Fold the overhang over and seal by pressing down with the tines of a fork.
Just before baking glaze the pie with the milk salt egg combo, and stab it here and there with the prongs of a fork to make steam holes.
Bake at 200c/400f for 10 minutes, then turn it sown to 180c/350f and bake for a further 45 minutes. Leave the pie to cool at least 10 minutes, but 25 is better.

Chocolate Verrines

My cousin, Martine has come to stay with me and has brought the latest in food crazes from Paris. These are 'verrines' which are basically beautiful small glasses which are filled with delicious foods. They can be savory or sweet, but I've decided to start with something sweet.
These cute little desserts are basically a chocolate mousse that is piped on top of amaretti biscuits that have been soaked in chocolate liqueur. Can you ask for better? The chocolate leaves on the top and mint chocolate leaves from Green and Black. Could you ask for easier or better?

Monday, 2 June 2008

Ready to Drink


Some of you may remember that I had a glut of mirabelle plums last summer. One of the things that I did was put some of the plums in alcohol and sugar. The jars were left untouched over the winter, probably because I was in the UK and unable to sample, (nothing like a thousand miles between you and temptation). Now I can say that it is well and truly ready to drink and even though I say so myself it's delicious.
The photograph was taken from the balcony of the house at the end of May.

The recipe :

All that I did was take a large jar. About 2 liters is good. I filled it with as many mirabelles as I could... push them in... then I added white sugar up to about the half way mark. Don't put too much sugar or your liqueur will be too sweet. Shake it down as it will tend to stay on the top. Now comes the exciting part. I filled the jar with 95% pure alcohol. Don't think for a moment that your finished product will be that strong. The plums will leech out their juices and mix with the alcohol making it much weaker. Leave to dissolve in a dark place. Shake the jar every day to help the sugar dissolve and when it is dissolved and the mirabelles are starting to shrink. However, taste a bit first. leave it longer if it still tasted of raw alcohol. Do not store in the light as the produce will turn brown rather than the amber colour that you see in the photo.

Do not throw away the plums as they are fantastic served in small glasses or over vanilla ice cream.


Sunday, 6 April 2008

Cinnamon Almond Ring Coffee Cake

This is a superb recipe that I got from the following site.

http://www.cookscountry.com/recipe.asp?recipeids=3843&bdc=46116&extcode=L8CN1BG00


It's all explained there so there's no need for me to go into detail, except to say that the filling was so runny that I had to add more almonds to stop it running off the dough.


It's delicious with coffee and even on it's own when no ones looking. I suggest that you keep it in the cupboard out of sight. Saying that it does not keep fresh for longer than a day or two so bake when there are lots of people coming around for brunch.

Thursday, 3 January 2008

Lemon Curd Cake

I must admit that I have a weakness for lemony things as well as sweet things so this lemon curd cake ticks all of the boxes for me and luckily enough most other people in my family like it too.


This cake is basically a victoria sandwich that is cooked in a tin that is bigger than the usual so that the end result is thin rather than thick. I make a 2 egg sponge and cook it in an oblong cake mold 27cm x 17cm. i have one of those fantastic silicone ones that never have to be greased and that the food pops out of without effort.

Sponge Recipe:
110g (4oz) Butter
110g (4oz) Caster Sugar
125g (5oz) Self-raising Flour
2 Eggs
1 tsp Grated Lemon Rind

Preheat oven to 190°C: 375°F: Gas 5.
Beat together the butter and sugar until light and creamy.
Add the beaten eggs gradually with a little of the flour.
Fold in the remaining sieved flour and add the flavouring.
Mix in about a tablespoon of water as this makes the cake lighter.

Turn the mixture out into the oblong tin.
Bake for 20 - 25 minutes.
Turn out on to a wire rack to cool.
When cool cut in half widthways. One half will be the top of the cake while the other will be the bottom.

To make the lemon curd:

Makes three 1 lb (350 ml capacity) jars
Ingredients
grated zest and juice 1 large juicy lemon
2 small eggs
4oz (110 g) caster sugar
2oz (60 g) unsalted butter, at room temperature, cut into small lumps
1 level teaspoon cornflour

Begin by lightly whisking the eggs in a medium-sized saucepan, then add the rest of the ingredients and place the saucepan over a medium heat.
Now stir continuously, using a wooden spoon, until the mixture thickens – about 7-8 minutes. Next, lower the heat to its minimum setting and let the curd gently simmer for a further minute, continuing to mix. After that, remove it from the heat.
Now pour the lemon curd into the hot, sterilised jars, filling them as full as possible, cover straightaway with waxed discs, seal while it is still hot and label when it is cold. It will keep for several weeks, but it must be stored in a cool place.

For the filling:


The lemon curd as made above and 1/4 pt of double cream.

To make the filling mix the cold lemon curd with whipped cream. and fill the sponge. Dust with icing sugar and cut into squares. You can cut them small to kid yourself that you are not having too much but then you can always eat two or even three.

Chocolate and Hazelnut Bars

This recipe has been adapted from the one given by Rachel Allen in her recent book. I found it on the BBc web site. I've made some changes as I thought that her recipe was too sweet so here is my version.

For the chocolate base:
200g/7oz butter
50g/2oz cocoa powder
200g/7oz caster sugar
2 free range eggs, beaten
225g/8oz plain flour
For the hazelnut caramel layer
125g/4½oz butter
1 x 397g/14oz tin condensed milk
2 tbsp golden syrup
75g/3oz caster sugar
125g/4½oz toasted and halved hazelnuts
For the chocolate topping
200g/7oz dark chocolate, chopped
1 tbsp sunflower or vegetable oil

Method
1. Preheat the oven to 160C/325F/Gas 3 and line the base of or grease, a small Swiss roll tin measuring 20x30cm/8x12in.
2. In a medium sized saucepan over a medium heat, heat the butter for the chocolate base, stir in the cocoa powder and then the sugar and mix until smooth.
3. Remove from the heat and stir in the eggs until mixed and then the plain flour.
4. Spread the chocolate base over the prepared tin and bake in the oven for 20 minutes until firm on top.
5. Remove from the oven and set aside to cool while you make the hazelnut caramel layer.
6. In a medium-sized saucepan over a medium heat, melt the butter and then add the condensed milk, golden syrup and sugar.
Turn the heat to low and stir continuously for 12-15 minutes until the mixture is dark caramel in colour (do not let it burn).
7. Remove from the heat and stir in the nuts. Spread evenly over the chocolate base and allow to cool.
8. Melt the chocolate in a bowl sitting over a saucepan of simmering water. When it is melted, stir in the oil and then pour over the caramel layer and smooth out, leaving to cool and set.
9. To serve, cut into squares. These will keep for a week in an airtight container.

Minestrone

Once the colder weather starts the first thing that I want to appear on my plate is a dish of warm minestrone. If I am really truthful I don't even have to wait for the cold weather as this is one of my favourite soups, ney foods. It's the perfect comfort food and has the benefit of several things: it's healthy, filling and it's easy to make. What more can you ask for.

Once you have the basic ingredients it will also let you throw in a few random vegetables without having a major strop. So for the basics. There is no need to sweat the vegetables as you will be cooking this soup slowly and the flavours will have time to develop. Simply put a pan of cold water on the hob and add to it as you go along. The amount of water varies according to the number of people that you cook for. Let's say about 2pts for 4 people. 
To this add 1 medium onion, 
2 sticks of celery 
1 bay leaf 
1 carrot 
1 small potato approx 120g. 
Don't get too precious as it can be slightly bigger or smaller. 
1 large vine ripened tomato or failing this about 1/3rd of a tin of tomatoes. 
A few stalks of flat leaf parsley I don't even bother to chop the veg up finely. 
You will soon see why. 
 Bring slowly to the boil and allow to simmer gently for about 1 hour. This is no hardship as there will be a lovely smell in the kitchen. Now use a potato masher and give the veg in the pan a bit of a bash. Don't make them too fine as you still want to identify them. They should just be broken up. 
You can now add any variations that you have. I like to add a handful each of: cauliflower florets which have been cut small peas, frozen are fine but fresh are better finely chopped dark cabbage precooked borlotti beans. 
Do not add swede, parsnips or turnips as they will not make a good soup. 
 Allow the soup to simmer until these vegetables are cooked and then season to taste with salt and pepper and a stock cube if you have one. Add a small handful of small pasta per person and cook until soft. Serve with a drizzling of extra virgin olive oil and lots of freshly grated Parmesan cheese. Enjoy!