Thursday 20 December 2012

New adventures in Panettone

Panettone is one of the breads that has become more and more popular in the UK. If you have visited Italy in the weeks preceding Christmas you will have seen that the windows of bakers shops are full of lovely artisan panettone. They are piled in mounds and their look of plenty characterises the abundant  season perfectly. Sadly the artisan panettone is not easily found in the UK. So, with this in mind I have decided to embark on a panettone adventure. Silly I know. I have enough to do, but I love a challenge.

I have read copiously on this subject. and there is a very good blog post on

http://www.wildyeastblog.com/2012/12/18/panettone-recipe/

Where you can learn a lot of very good info about the making of panettone and why it takes so long to get it right.

However, and there often is an however with me, I have made a few changes as some of the ingredients that she uses do not fall readily from the supermarket shelves.

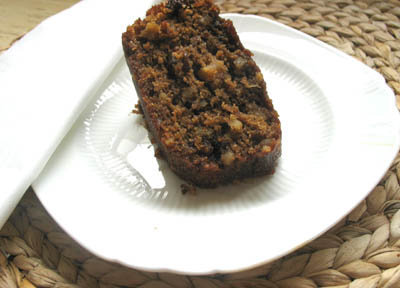
The panettone, like Rome,  is not made in a day. So, first and foremost give yourself at least 24 hours. That does not include the cooling time which is as important as every other stage. Doing a rough count on these figures, It will take a day and a half to make a panettone.

Next important point to remember: The first raising takes about 12 hours. So, if you can possibly manage it, make the panettone in the evening and then your panettone will be ready to cook in the late afternoon of the next day. This will allow you to cool the loaf and, if all is well, you can eat your panettone for breakfast the next day. Yumm.

If you want to have the characteristic shape, it is good to have high sided tins for making panettone. I bought two from Lakeland. This recipe will make two panettone. I bought 18cm x 7.5cm tins.

The panettone dough is made in two stages.


First  Ingredients:
  • 350 grams flour I used 250g strong flour and 100g plain flour. (Italians tend not to use flour that is too high in gluten. The use of the 'mother dough' will help to develop gluten and keep the crumb soft.
  • 190 grams water
  • 20g fresh yeast.Thank you Tesco for the yeast.
  • 83 grams sugar
  • 3 medium egg yolks. I used British eggs but as I always I am disappointed with the colour. Only in Italy are the eggs bright yellow. Oh to be there.
  • 83 grams unsalted butter, at room temperature
  • 86 grams lievito madre. See my other posts on making this prized beauty that I keep alive in my fridge.
Put all of these ingredients in the bowl of a stand mixer with a dough hook.  Allow to mix on a low speed until the mixture becomes pliable and the gluten has developed into long strands. All that I can say about this is that if you pull the dough it should be about 24 to 30 inches long before it breaks. It truly is magical when this happens. I had to call my husband to show off. Well, why not. Cover. leave at room temperature overnight.

Back tomorrow

Well tomorrow took rather a few more days than anticipated as my daughter was ill and we had to go and look after her. 

So here'e the next stage:

Second Set of Ingredients: Again this deviated from wild yeast as her addition of water made the dough far, far too wet.


  • all of the first dough
  • 150 grams flour
  • 5 grams (7/8 teaspoon) salt
  • 2 egg yolks
  • 1 teaspoon of vanilla extract or paste
  • zest of half a medium orange
  • 80 grams sugar
  • 125 grams unsalted butter, at room temperature (pliable)
  • 20 grams honey
  • 150 grams raisins
  • 126 grams candied orange peel... I made my own.... See below   

Put the first dough in the mixing bowl and add the egg yolks, honey, sugar, salt, vanilla orange peel. Mix until combined. If you think that the mixture is too still add about a tablespoon of water.

Now add half of the flour at a time, combine well between each addition.

Cut the butter into cubes and, while the mixer is on low speed, drop a few chunks in at a time. Make sure that all is well combined and the mixture has become fairly sticky. Don't add water now.

Add the candid fruit and raisins and mix until all is combined. 

Divide the mixture in half. It will be quite sticky and long strands of gluten will cling to your fingers while you try to do this. This is what you want.

Lightly flour your work board and oil your fingers. Now fold the dough from underneath into the centre a few times. This is essential as it will strengthen the gluten and help the panettone to keep its shape while rising and cooking. Drop into the oiled tin or papers. Cover with a clean carrier bag or a shower cap and leave in a warm place to rise.


Wednesday 21 November 2012

Chelsea Buns

Chelsea Buns remind me of my greedy childhood. They were the most tempting thing in the baker's bread range because they were huge and fruity and sweet and most importantly I was allowed to spread them with butter. Can you get more decadent or even unhealthy? I loved every buttery bite.


Today, though I am going to bring them more up to date and give them a modern twist by substituting the raisin/sultana filling with my husband's favourites: apricots and almonds. I know how to keep on his good side and no doubt I will be only too glad to eat one or two myself.

Ingredients:
250g lievito madre
500g strong flour
50g butter
10g fresh yeast
150 g sugar
2 eggs
50g dried milk powder
300 ml water at body temperature

Filling
200g soft apricots chopped
150 chopped almonds
100g unsalted butter
150g light muscovado sugar

Sticky Topping
2tbs honey
100g light muscovado sugar
100ml milk
100g unsalted butter

Start by putting all, yes all of the ingredients for the buns in a bowl and mixing with your hands until you have a cohesive ball of dough. Now, if you have a stand mixer, put it in the mixture and, using the dough hook, mix for 8 minuted. If not kneed by hand for 10 minutes. Return to the bowl and cover and leave to rise. It should at least double in size. This may take anything up to two hours as the dough is enriched and enriched doughs take a while to rise.

While you are waiting, rub the filling ingredients together until you have a crumbly mess.

You can also get the topping ready. Put all of the ingredients in a saucepan, stir and bring to the boil. Switch off and leave until you need it.

Now, turn out onto a lightly floured work surface and prod the dough out into a long rectangle. To be honest I didn't measure, but it should be twice the size that you would expect to have in a swiss roll.

Mix the filling ingredients together and crumble it over the dough until you have covered almost the entire surface of the dough. You should leave about an inch uncovered on one of the long sides of the dough. Roll the dough up to make a long sausage. I then cut mine into 14 pieces. This seemed to be about right. Don't make them too thin as this is a Chelsea bun, not a pains aux raisins. A good thick bun is a sign of a good Chelsea bun.

Put them in a greased baking tin, cut side up. There should be some space between the buns. This will fill and the buns should be touching when they have risen. Cover and leave to rise. Approx. 1 hour should be about right. You should have a marshmallow texture on the buns when they are ready.

Cook in a preheated, 200 degree oven for 10 minutes and then turn the oven down to 190 and cook for a further ten minuted. Now take out of the oven and brush with the topping. Then return to the oven and cook until golden brown.

As you can see from mine, the buns catch easily. So cover if you can see than this might happen. It is better to cook them lower rather than higher in the oven.


Enjoy!


Thursday 1 November 2012

Spezzatino di Vitello a la moda mia

Spezzatino di Vitello a la moda mia .... sounds so good in Italian. What it actually means is veal stew my way. Not so glam I think.


Whichever title you choose this is a wonderful, rich and savoury meal that you'll want to make over and over again.

It is simplicity itself to make  as it only requires a short prep time and, as it's veal rather than beef, a  short time to cook.

You will need

1kg stewing veal
1 large onion, chopped fine
2 large cloves of garlic,  crushed
1 stem of celery chopped fine
1 bunch of flat leaf parsley chopped
1 medium carrot chopped
2 glasses of dry white wine
oil for frying ... groundnut or olive
1 rounded tablespoon of tomato puree
1 stock cube.

Start by adding a couple of tablespoons of oil to a frying pan. Heat the pan and when the oil begins to smoke add the pieces of veal, a few at a time, and fry until golden. Remove from the pan with a slotted spoon and set aside.

Now add the chopped onion, carrot and celery to the pan and fry gently until soft. You really don't want this to brown as the stew is a light one.

Put the veal back into the pan. Stir all the ingredients to blend and throw in the wine. bring to the boil and let it bubble for a few minuted to evaporate some of the alcohol.

Add the tomato puree and enough boiling water to just cover the meat. Turn down to a simmer and either cook on the top of the stove or in a slow oven (about 140 C) until the meat is tender. This can take from one to two hours. It depends on the precise cut of veal.

When the meat is cooked, season with a crumbled stock cube to taste. If you have too much sauce, then boil to reduce.

Sprinkle with chopped parsley and serve with peas and polenta. Delish!


Saturday 20 October 2012

Making a Lievito Madre or Mother Dough

There seems to be a craze all of a sudden about making starter doughs to add flavour to bread. I think that it is a backlash against the flavourless and pappy bread that seems to be available in our shops. So, I've decided to try out a variety of starters to see which one works best for me.

I am going to start with the Italian version which is, Lievito Madre.

The initial mixture is:

100g water
200g stoneground flour
1 dessertspoon of honey.

Day 1
Put them all in a bowl and mix together until a stiffish dough is formed. Cover with a folded, damp tea towel and leave undisturbed for two days.

I have mixed my dough so I'll come back in two days and add to this to let you know how it's getting on.

Day 3
So, two days have gone by and my dough has surprisingly started to produce small pockets of gas as it begins to ferment. Now take a

100g piece of the dough and add
100g strong flour
45g room temperature water. Mix into a ball of dough and then put into a jar and cover.

Put this mixture aside and leave for a further two days.

Now, what do you do with the 200g of starter mixture that is left over? Throw it away, is the usual method, but I am far too frugal to do that so I made not one but three mixtures and now I have them all going onto the next stage.

I will give one to my daughter and one to a friend.  I am starting to understand the concept of the German friendship cake.

Day 4
I know that you'll all understand that I couldn't resist taking a peek and all that I can say is, 'Wow.'
The fermentation is well and truly underway as the mix has doubled and you can even hear the bubbling. Roll on tomorrow so that I can do the next stage.


As you can see from the picture, the madre is well and truly fermenting. It rose to the top of the containers and then fell back, which is a good sign that they need feeding.

Here's a better picture of the fermenting dough. Love those air holes.


Day 5
Today we move onto the next stage. I am allowed to touch rather than just to peek and get excited about a bit of fermentation. (I really should get out more.)
The dough should level out by today and be flat on top but full of lovely holes underneath.

What you need to do according to the usual method is:

Take 100g of the fermented dough and mix with 100g flour and 45g water.

Am I real supposed to throw away the rest? I think not!

So what I did was to weigh out the dough. Then I added an equal weight of flour and 45g of water per 100g of fermented dough.

So, in theory it goes something like this:

700g fermented dough  +  700g flour  +  315g water.

I admit that I now have a lot of ferment, but it still has a way to go and I will be able to store it once it has reached the final stage ..... in 15 days time.

Patience, patience, patience. How long can one wait for a loaf of bread? It had better be good.

Day 6
I had a peek. Wow, the dough has risen to the top of the containers. I am so impressed. All without the aid of any yeast. I am so tempted to use it straight away. Be still my beating heart. It's a good thing that I am going away for a couple of days. That way I will be forced to leave it. You can bet that hubby won't be tempted to bake although he will be tempted to eat.

Day 9
By now the dough has risen and flattened out, so, I reckoned that it was time to feed and water my dough so I repeated the method above:

So what I did was to weigh out the dough. Then I added an equal weight of flour and 45g of water per 100g of fermented dough.

By now I have a lot of dough as you can imagine. More than 3Kg! So much bread waiting to be made.

Day 10
Today, even though it is a bit early, I made my first loaf. I am stockpiling the madre to the point that I will have to go out and buy another fridge to keep it. However, because the madre is probably not as active as it should be as yet, I did add some yeast to make sure that the bread rose. This is what I got.


This is what it looks like when cut. I do feel that I should have left it longer as it is not easy to cut hot bread, but heigh ho it was wonderful. You might notice that this bread has a pronounced and golden crust which is exactly what I was after, so one thing achieved anyway.


Day 15
The Lievito is ready for feeding. I feel rather like I'm feeding some sort of hungry monster. I now understand why most recipes tell you to throw away the  excess. If you don't, as I didn't, then you end up with an awful lot of madre. 

Day 21, I think
Whatever the day, I think that the madre is ready to use.

Recipe

250g lievito madre
500g strong flour
300g to 350g of slightly tepid water
3 level tsp salt
5g fresh yeast

So it has to be measured out and I took a 250g piece of the dough and cut it into pieces. Then I put it in a bowl added the water.

After about 10 minutes whisk it up and it should look like the mixture in the photograph. This is far more like a conventional sourdough starter.
Mix the flour and the fresh yeast together and then add the starter and mix well. Now add the salt. You can decrease this to 2 tsp if you like a less salt. 

Put the dough onto your work surface and kneed for at lease 10 mins. You should then have an elastic dough that almost bounces and feels alive in your hands. You'll know what I mean when you've done the kneading. 

Put into a large bowl, cover  and set aside until at least doubled in size. 
Turn out onto t work surface and flatten into a  rough rectangle. Fold the dough into three and press flat. Do this agin. Now, snap as you want and put onto a baking sheet to rise. This can take from 30 minutes to two hours. It depends on how warm your kitchen is. Dust the bread with flour and slash the top.

Heat your oven to a super 240 degrees C and when it is good and hot put the bread into the oven. It will take about 40 mins to cook. Test for doneness by tapping the underside of the bread. It will sound hollow when it is cooked.

Resist eating until cool. Below is one of the loaves that I've made.


I have had the starter on the go since 20th October. I used the blog to record what I was doing for future reference. It is easy to keep it going as all it needs is a little feeding every 5 days or so. What I usually do is add 200g of flour and 90ml water to the sourdough the night before I am going to use it as this ensures that the dough is active and ready to go. Then use 250g of the dough as part of the loaf mixture. That way it stays alive.
Warning though. I gave my daughter some and she managed to kill after only about a week. Forgot to feed and the top came off. It needs to be kept moist.
I think that I’ll add this to the blog info.

Tuesday 18 September 2012

Summer in Italy and Sponge Drops

Whoops, I've spent the summer in Italy and, as usual, my poor connection does not let me blog. I have been cooking though and taking pictures so I have lots of catching up to do.

Follow Me on Pinterest
I'll start with these delightful sponge drops as they are one of the foodie memories of my childhood. Soft sponge with a crisp outer shell encasing light fluffy cream and a sharp blackcurrant jam. Utter bliss.

These sponge drops are fairly easy to make and better still, unfilled can be frozen so that when the urge comes upon you that can be filled and, dare I say it, scoffed in an instant.

To make them you will need:
90g Plain flour
3 Eggs separated
90g Sugar
Vanilla essence
Icing sugar for dusting if you want to use it.

Heat oven to 240C. I have found that a fan oven is not good for this type of sponge as the sponge tends to crinkle and get smaller after it has cooked. A top and bottom heat is good.

Start by whisking the egg whites until really stiff. You can do this by putting the bowl over a pan of simmering water to heat the egg whites, or, use the cheats way, which is what I do and put the microwavable bowl in the micro for 10 second blasts. I find that it works a dream. Do be careful not to put it in for longer as you don't want cooked egg.

Break up the egg yolks and vanilla essence up with a fork and fold lightly, but throughly into the egg whites.

Now fold in the flour. Take note, there is no need to use a raising agent as the beaten egg is really all that you need. Be warned, do not be tempted to add any.

Put the mixture into a piping bag with a wide nozzle and pipe rounds the size of a small golf ball (does such a thing even exist) onto the a non-stick mat. They will rise and spread a little while cooking. If you make them bigger than you will just have to eat more so no hardship there.

Follow Me on Pinterest

Cook for about 10 minutes or use your judgement and cook until lightly browned. It will depend on your oven.

Remove from the oven and allow to cool. Thankfully they don't take long to do this so get whisking while they cool.

The amount of cream that you use is up to you but I found that 125ml was enough to fill about 6 - 8 sponge drops. Whisk the whipping cream in a clean cold bowl until it reaches the stage just beyond soft peak. I think that it has a technical name but I've forgotten what it is. Put into a piping bag and pipe over half of the sponge drops. Top with a dollop of jam of your choice and add the second half. Dust with icing sugar and eat.
Follow Me on Pinterest

Wednesday 4 July 2012

Spinach and Ricotta Pancakes


For these melt in the mouth pancakes you will need:

100g cooked spinach
3 tbs SR flour

125g ricotta

2 small eggs or 1 large one
3tbs milk you may need a little more, see below
½ tsp salt
1 tbs grated parmesan cheese

Chop the spinach up really well. You want something that is fine. No big chunks here.

Add to a bowl with all the rest of the ingredients and mix well. At this point, you can decide whether you need any more milk. What you are aiming for is a thick batter that will drop off the spoon and spread a little in the pan so that you get a thick smallish pancake rather like an American breakfast pancake.

Heat some vetgatable oil in a heavy based frying pan and cook over a moderate heat until lightly brown on one side. Flip over and cook on the other side. Serve hot with a thick tomato sauce and a good dredging of parmesan cheese.

These are delicious as a starter or a vegetarian breakfast alternative to a British fry up.

Saturday 16 June 2012

Nothing more homely than 'Corned Beef Pie'

I have a friend whose son lives in London and eats at expensive restaurants, but when he comes home to his Mum in Wales his food request is always corned beef pie. What is it about nursery food that brings out the soft side in grown men? Whatever it is, it is worth having a few nursery treats on hand to keep them satisfied. A bonus is that, uncooked, it freezes well.
So here is my recipe for the well loved pie.


The filling
1 tin of corned beef approx 350g
700g potatoes
1 onion
50g butter
salt and pepper

Chop the onion into small dice and fry in half the butter until golden.
Peel the potatoes and steam until soft. mash and put aside.
Cut the corned beef into  chunks and add to the warm potatoes along with the onion and the rest of the butter.
Season with salt and pepper to taste.
Allow the mixture to cool while you make the pastry. Do not be tempted to add hot mixture to the pastry as it will melt and be really difficult to work.

Preheat your oven to 200 degrees C

For the pastry:
300g plain flour, or you can use 100g wholemeal flour and 200g white flour
1 teaspoon baking powder
150g butter
water
Salt and pepper

Rub the butter into the flour until it resembles fine breadcrumbs.
Add the salt and pepper to taste. Don't add too much as corned beef can be salty.
Add sufficient water to the mixture to bring it together in a ball of pastry. Do not overwork as it will make your mix tough.

Line a metal dish with two thirds of the pastry. Add the corned beef mix and smooth the top.
|Roll out the remaining pastry and cover the mixture.
Trim any excess pastry and crimp the edges to seal.

Cook in a preheated oven yntil golden brown. This can take between 30 - 45 mins. Make sure that the underside is cooked.

Enjoy.
.

Tuesday 29 May 2012

Strawberry Jam Making


At this time of year the strawberries are coming into their own, There are lots of luscious things to make with them, namely adding a small amount of sugar to them , allowing them to macerate for about 15 minutes and then eating with creme fraiche and meringue. What could be better. However, my brother gave me 2Kg of strawberries this week and as much as I love the above strawberry dessert, there were so many that I was moved to make jam!! The exclamation marks are there because I am no lover of strawberry jam. I have always found it too sweet for my taste. I prefer plum or sour cherry jams and when they are really good apricot jam, Oh and I forgot to mention blackberry. In the past I have tried to make strawberry jam myself and while I have not achieved jam I have made a very nice syrup. I think that you are beginning to understand my feelings about strawberry jam.

So, faced with these strawberries, I suddenly remembered the recent Raymond Bland television series, in which he met Christine Ferber, who is the acclaimed jam maker of France. I decided that if she couldn't give me a recipe for decent strawberry jam then no one could.

What I found was interesting, but her method of making jam over a couple of days is not a new one. I have seen it in old cookery books that I had on my shelves. Basically you take:

1Kg of hulled and quartered strawberries
1 kg of sugar ( I only used 650g)
1/2 a lemon

This is not a new recipe.

TAKE NOTE
I also uses a packet of powdered pectin. Don't use the liquid one as it is awful.
I don't like too much sugar in jam so I only used 650g. Far healthier and better.

Let’s  proceed. This is my adapted method and not the precise one given by Christine. 
Put the strawberries in a non reactive bowl ( plastic). Cover with 500g of sugar and the juice of half a lemon and stir. Place in the fridge overnight to let the juices run.
Next day, put the bowl in the microwave, plastic can be so handy, and bring up to boiling temperature. Switch off and allow to cool. You can do this in a sink filled with enough cold water to cover the base of the outside of the bowl. No water in the bowl. Return to the fridge. Leave overnight.
By the next day you will have a good amount of strawberry liquid and some, almost candied, strawberries floating about on the top. Strain the liquid into a medium saucepan and put the strawberries back into the plastic bowl.
Put the strawberries back into the microwave and heat up. This should take about 3 minutes. They need to be hot when they go back into the syrup as it speeds up the setting time.
Bring the strawberry liquid up to the  a rolling boil until it reaches 105 degrees C. Add the warm strawberries to the liquid and return to 105 degrees. Then add the rest of the sugar that you have mixed in with the powdered pectin. Mix well and boil rapidly until you reach 105 degrees. This should take about 4 minutes. Test for setness by doing a wrinkle test. See Delia for help on this.
Pour the jam into sterilised jars and put the tops on straight away. As the jars cool that should pop and this will tell you that an airtight seal has been created which will help your jam to stay fresh.
I found it helped to turn the jars upside down from time to time as this helps distribute the strawberry pieces.

Now for what I found.

I used my trusty thermometer that I bought from IKEA a couple of years ago. It is a probe so I think that it is much better than a sugar thermometer which is hard to read and a pain to clean.

It is really difficult to get the syrup to reach 105 degrees. I put it on the highest heat that I had and it insisted in boiling away like mad but never getting higher than 99. I now believe that this is the reason that my jam has never set before. I have never actually reached the setting temperature. You can boil for ages and make a disgusting jam without reaching a setting point.

This is why I cheated and added powdered pectin that I bought in France. Makes life so much easier and gives you a jam that sets without boiling the flavour out of it and helps to enhance the taste. Do not bother with liquid pectin as in my opinion it has a distinct flavour that will spoil the jam.


Monday 9 April 2012

Crostata di Prugne Secche

Prunes are delicious. I know that in the UK they make people think of school dinners but a decent Agen prune cannot be beaten for flavour so when I was deciding on what to cook as a cake today I went for a prune filling for my pasta frolla. I did put a twist on it though so you will be delighted that it is not neat prunes, which it could well have been,

I started with the pasta frolla.  The recipe is so easy it is just the rolling out that you need to be careful with. It is a soft pastry that tends to break so I usually use cling film and roll it out on that. It is then easy to pick up and drapes over that cake tin.

Ingredients
150g butter
250 flour
grated rind of 1 lemon
Half a pack of lievito or two teaspoons of baking powder
2 egg yolks
150 sugar

Beat the sugar and butter together until creamy.
Beat in the egg and then fold in the flour and the baking powder until you have a soft dough. You can put it to rest in the fridge for about half an hour if you have the time.

Put a piece of cling film on the work surface and roll about two thirds of the pastry out on that. Make sure that it will cover the bottom and sides of the tin that you will be using.


For the prune filling

300g pitted prunes
100ml whipping cream
Brandy Use as much as you need to make a spreadable paste. I used about 100ml.
50g sugar

Put the prunes, brandy and sugar in the food processor and pulse until you have a thickish paste. It should still have bits in it . Too fine will be like baby food.
Turn it into a bowl and beat in the cream until you have a spreadable paste.

Spread over the pastry base and then roll out the remaining pastry and cover the filling. Trim and neaten the edges of the pastry.

Cook in a fairly hot oven for about 30 - 40 minutes until golden brown. Leave to cool and dust the top with icing sugar.

This cake is quite rich so small pieces are perfect.

Thursday 5 April 2012

Saucy monkey Pudding


How many of you have over ripe bananas going to waste in your fruit bowl? You know as well as I do that there is only so much banana bread that you can make. So you'll be delighted with this pudding from Short and Sweet. This time it's for hot, buttered nutty bananas with a banana chocolate sponge. Serves four. As an aside, and an important one at that, I couldn't resist making a pudding with this name.

As this super scrumptious recipe has been published in the Guardian, you will have to go there for the details, but please leave a comment here.
Miraculously, I didn't change a thing!
I've been asked to direct you to the Guardian page for the recipe.

Dan Lepard's Rum Cake


Although this recipe was published in 'The Guardian', those of you who have seen the previous post will know that I have the wonderful book from Dan Lepard so I actually used that one. I also cooked it in a round thin in the shape of an 'O' as Dan suggested. I think that this helped as the cake cooked more quickly than if it was a traditional round cake. The moisture in the cake might have made it sink.


Please don't expect this to be a pretty cake but, what it lacks in looks it makes up for in taste. I think that you will see that the cake is very moist. It could be the pineapple that is cooked in the mixture or the copious amounts of rum that were included in the ingredients and poured over it after cooking. Who cares really as the result was mouthwatering.


I did have to make some changes, not because I thought that the recipe needed it, but because I was missing a few ingredients and so I substituted, almonds for brazil nuts, raisins for dates and mixed spice for the spices. otherwise it was exactly as published and I must say, delicious. You will not regret making this cake. Your only regret will be in eating the last slice.
Recipe can be found here at the Guardian

Short and Sweet

I think that I've just bought the best cookery book ever and that it a statement that I don't bandy around without thought.

I bought this book despite the lack of pictures as the recipes and writing are so tempting that I couldn't resist.

I've already made a few things so as soon as the pictures are available --- problems with computers ---  don't ask, I will get them out to you.

Tuesday 31 January 2012

Let me see

It occurred to me today that, if the statistics for this blog are correct, a lot of people look at this blog.  A few leave comments, but no one has told me about what they have cooked and whether they liked it if they did so.

So I am throwing out the challenge.

Tell me what you have made from the recipes on this blog.

Did you like what you made?

I'm waiting.

Sunday 22 January 2012

Peccati al cioccolato has arrived

Last year while in Italy I ordered two of Luca Montersino's books from Amazon in Italy. They were sent out quickly enough but it took me three weeks to have them delivered. So a couple of weeks ago, when I saw a that the maestro had published a new book I took the plunge and ordered it from Amazon Italy again. This time for a UK delivery. Guess what, it arrived in  less than a week. That speaks volumes for the Italian delivery service.
I have been drooling over it since it arrived. Unfortunately, I haven't cooked from it as yet as, gulp, I am on a diet. High cholesterol and too much weight gain for the first time in my life! Aghhhh! I won't bore you with the details.
Needless to say that with this inspirational book in my grasp I want to cook and I want to cook all of the lovely fattening things in it too. What I love about Montersino is that he hardly ever does the mundane. It is not just a rehash of all the cakes available in other chocolate cookery books. These creations are all his own. The pancake wrapped log is amazing. It slices to reveal beautiful rings of chocolate mousse and pancakes with chocolate cake and other goodies.
As yet, this book is not available in the UK. Montersino books in general are cheaper if you buy them from Italy even with the postal charges. It is also in Italian, so please don't buy it if you can't read Italian. I would hate for you to have to drool over the piccies and not be able to create anything.
Lucca Montersino. What can I say.

Tuesday 10 January 2012

German Friendship Cake - part 2 - Cooked.

Well.... the cake is cooked. Here it is in all its glory.

It's probably not the most promising looking cake I must admit. It's brown and plain.

However, the smell while it was cooking was divine and I couldn't wait for it to be cooked so that I could eat it.
So, not being silly and waiting for it to cool down or anything sensible like that, I cut it. For photographic purposes you know.

The taste was as good as the smell promised and I do advise that you go ahead and make one. I have some spare starter of course.

Friday 6 January 2012

The most popular post on this blog. - Torta Di Patate

As seems to be the trend at the moment, I have been looking back over the popular posts in this blog and the one that wins hands down is this one for Torta di patate. Strangely enough it is the very first post that I put on this blog and I did it to stop my brother phoning me every other day for the recipe. So for all of those who don't want to scroll to the very first post on this blog here it is:

For my first recipe will go to the region that my parents come from in Italy, Parma and more locally Bardi. If there are any other Bardigani out there reading this then you will recognise this local speciality, as it's TORTA di PATATE. No Italian picnic is complete without a torta and in my region they even have feste to this torta.

To make a fairly large torta, about 45cm x 30cm, there's no point in making a small one, you will need:

2kg of floury potatoes. My mother used King Edwards but Maris Piper are good too. Don't bother with new potatoes as they tend to be gluey and not good.
2 leeks, white and green cleaned and chopped fairly small
a piece of lardo to fry the leeks. Failing this and in a British kitchen that is fairly likely use some Fatty bacon chopped. Do not use smoked bacon the flavour is wrong in this dish.
1 packet of cream cheese.
A handful of freshly grated Parmesan.
1 or 2 eggs depending on how dry the potatoes are
Some cream remember that this is an Italian recipe so the quantity that I will give is: as much as you need.

For the pastry

250gm plain flour
75gm butter
water salt.

Make the pastry by rubbing the butter into the flour and add enough tepid water to make a softish dough. Roll out to line and overlap a shallow tin.

Steam the potatoes because if you boil them they will be wet and in some cases disintegrate. Mash them and put aside.

While the potatoes are boiling you can fry the bacon or lardo if you are lucky enough to get it and then add the leeks and continue to fry until the leeks are soft. No need to colour the leeks.

Add to the mashed potatoes with the rest of the filling ingredients. mix well.
pile into the lined pastry dish and level out. Flip the overlap pastry over the torta and pat down
Cover the torta with an egg wash or if you are feeling mean then use milk.
score the top with the back of a fork to make a criss-cross pattern.

Cook in a fairly hot oven until it is well cooked underneath. Cover the top to prevent burning if necessary. In Italy it would have been cooked in a bread oven after the bread had been cooked and the oven had cooled.

Hope that you like this.

Thursday 5 January 2012

German Friendship Cake

Many of you have no doubt heard of this particular cake and I Googled it to find that there is even a large 'fan' club of cake makers. Basically it is a cake or even a process that starts with you being given a starter by a 'friend'. Needless to say, I have been given a starter. I hope that there is not a collective grone going on from my readers. Although I suspect that those who have been given one will be doing just that.

Another thing that I discovered is that there are many posts on looking after the starter and keeping it alive but as far as I could see, not too many of the actual cooked cake. So I thought that I would give this whole process a go and make a cake.

I was given a starter about a week before Christmas and as Hubby and I were going away for Christmas we took the thing with us. Well you have to don't you. It needed stiring and feeding and it also needed to be kept warm so no leaving at at home. You can guess what happened..... I left it behind. So on the day that I was supposed to cook  it I was left with no starter. I am rapidly beginning to understand all of the posts on keeping the starter going.

Not to be outdone by a bowl of frothing mess, I opened my cookery books and found one for making the thing from scratch.

This is what you need to do:

Starter
280g plain flour
15g fresh yeast... if you don't have fresh yeast than a teaspoonful of dry yeast is fine.
445ml water

Throw the lot into a non-metallic bowl and mix well. you should have a sticky batter. Cover with a damp tea towel and leave on the kitchen work surface . Each day, give it a stir and recover with the tea towel. You will need to re-dampen the towel. Now three days later your starter is ready to use.

You are now on day 1 of the process. I kid you not.

Watch this space. There is more. We are still 10 days away from  making the cake.
Are you beginning to uderstand why the finished cake does not figure large?